Node.js

Introduction
Most websites and web applications must implement some form of a client-server network for them to have any meaningful functionality. There are many languages and technologies that allow you to implement this. However, if you wanted to create this application using JavaScript then you run into an issue. JavaScript only handles client-side programming. If you wanted to create a client-server network using JavaScript, you would have to write the server-side code in Java, or some other language. Node.js solves this issue by bringing JavaScript to the server-side. Node.js has an interesting history, and comes with a plethora of features and design choices that make it a scalable and efficient runtime environment for web development.
History
The most similar predecessor to Node.js was called, “NetScape LiveWire”. Unfortunately, there wasn’t a large demand for server-side JavaScript at the time. As a result, NetScape LiveWire was ultimately unsuccessful. As JavaScript became more advanced and efficient, the demand for server-side JavaScript capabilities also increased. This lead to the introduction of Node.js in 2009, created by Ryan Dahl [NodejsDev].
Node.js allows developers to create server-side JavaScript through the Node.js runtime environment. Shortly after its creation, other important libraries and features were created. Npm was created in 2009, and both Express and Socket.io were created in 2010. Node.js would continue to be updated with a new stable version every year, with Node.js 8 being released in 2017 and Node.js 10 being released in 2018 [NodejsDev]. The odd numbered Node.js versions are considered to be betas and the even numbered versions are considered as stable builds [LearningNode].
An Introduction to Node.js
What is it?
Node.js is a runtime environment that brings JavaScript to the server-side. It allows you to create web applications using nothing but JavaScript. Many developers are experienced with JavaScript and client-side programming. However, they may not be experienced with languages that support server-side programming like Java. This allows these developers to move to server-side programming without changing languages [Nodejs].
Node.js has other advantages as well. For example, Node.js is single-threaded. Multi-threaded networking tends to be less efficient and is difficult to implement. Since Node.js is single-threaded, it’s far less likely to have thread-related bugs or issues. Despite being single-threaded, Node.js will never lock because everything is asynchronous. This also allows Node.js to handle thousands of requests at the same time [Nodejs].
Node.js runs on the Chrome V8 JavaScript engine. This makes it run very quickly, even for large-scale applications. Node.js has a massive collection of libraries that can be easily installed through npm. Some popular examples of these libraries are express, socket.io, koa, Colors, and more. It allows you to easily create and implement your own modules as well [Nodejs].
How does it work?
Unlike traditional programming, Node.js doesn’t run line by line. Instead, Node.js relies on something called, “Asynchronous Programming”. This isn’t a new concept introduced by Node.js. However, Node.js uses it nearly exclusively [LearningNode]. The following jQuery code is an example of Asynchronous Programming.
$('#example').on("click")
This program doesn’t stall while waiting for that function to call. Rather, it calls that function when the event actually happens. That is how Node.js works. It is entirely event-based and relies on functions like the example above. Asynchronous Programming is advantageous because as mentioned earlier, it will never stall. It allows the website the process multiple things concurrently and supports live updates. To understand how Node.js implements Asynchronous Programming, consider the following, “Hello World!” example [LearningNode].
var http = require('http');

http.createServer(function(req, res) {
        res.writeHead(200, {'content-type': 'text/plain'});
        res.end("Hello world!\n");
}).listen(8124);
So what does each line of this program actually do?
var http = require('http');This loads the HTTP module which is essential for basic HTTP functionality and network access.
http.createServer(function(req, res)This is a function within the HTTP module that creates a basic server. An anonymous function is passed in the parameter with the arguments of req and res which represent a server request and a server response. This function doesn’t need to be anonymous.
res.writeHead(200, {'content-type': 'text/plain'});This modifies the content type and status code of the response.
res.end("Hello world!\n");This line writes, “Hello world!” and ends the response. Alternatively, you could do the following for the same effect.
res.write("Hello world!\n");res.end();
.listen(8124);This last line is an example of asynchronous programming. It’s asynchronous because it only calls when the connection to the port is established.
The Event Loop
So how do these asynchronous functions actually work? Node.js relies on callbacks and operates with something called, “The Event Loop”. The Event Loop operates in a series of phases. These phases can best be described with the following graph [EventLoop].
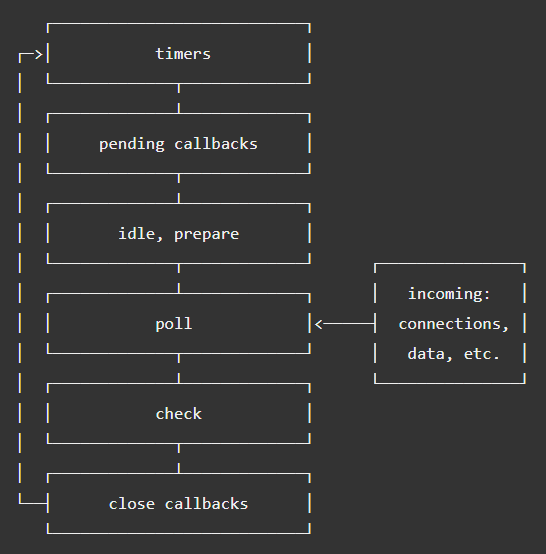
So, the data starts by going to the poll phase which simply receives input
or data. Next, it goes to the check phase which is where setImmediate()
callbacks are executed. Then any callbacks involving disconnections or closings
are called in the close callbacks phase. Then it runs all the callbacks
defined by the timers in the timers phase. For example, through
setTimeout() or setInterval(). Lastly, it runs any other callbacks that
are still pending in the pending callbacks phase. There’s also the
idle, prepare phase but these can’t be influenced since they run internally
[EventLoop].
Timers can be used to delay the execution of some function. The most common way
to accomplish this is through setTimeout() or setInterval(). The
difference between these two is that setTimeout() runs once after the
designated time, and setInterval() will continue running indefinitely with
the interval as the designated time. For example, the following code will print
out, “Hello World!” to the Node.js server console 1000 milliseconds after the
program starts [LearningNode].
function hello(res) {
        console.log("Hello World!");
}

setTimeout(hello, 1000);
The following uses setInterval() instead, in this example it prints out,
“Hello World!” every 1000 milliseconds indefinitely.
function hello(res) {
        console.log("Hello World!");
}

setInterval(hello, 1000);
What are its disadvantages?
Node.js has many advantages. However, it also has some issues. One major issue is that Node.js is not designed for computationally expensive applications. For example, it would not work well for optimization problems, or a GPS navigation application that calculates the best path to a destination. It’s better to use Node.js for lightweight applications that have a lot of clients at once, such as chat rooms [LearningNode].
Since Node.js is asynchronous, it comes with an additional problem sometimes referred to as, “The Pyramid of Doom”. This happens when there’s an excess of nested callbacks that leads to an unreadable mess. However, “The Pyramid of Doom” can be easily fixed by having callbacks call outside functions rather than putting the code inside the actual callback. An even better solution is to use the Waterfall feature of the Async module. This feature works by chaining these callbacks together in an array [LearningNode].
Modules of Node.js
There are a plethora of modules you can install with npm. Each of them have their own unique features and uses. Developing Node.js applications is much easier through the use of modules. For example, some of the most important ones are socket.io and express. These modules greatly simplify the process of writing Node.js applications.
Socket.io
Socket.io makes communication between the server and its clients easier. Socket.io can also be used with Express which will be mentioned in a later section. How Socket.io works can be seen with the following code. This comes from the example project found at the end [SocketIo].
// This runs when a user connects to the server.
io.on('connection', function(socket) {
        // Some omitted stuff...

        // Tell the client (and only this client, that's why it's io.to) that they connected to the server.
        io.to(socket.id).emit('on page loaded', picture);

        // More omitted stuff...

        // Runs when a user leaves the chat.
        socket.on('disconnect', function() {
                // Send a message to all clients that someone left.
                io.emit('chat message', "", "", 'red', users[socket.id].username + " has left the chat.");
                io.emit('userlist remove', users[socket.id]); // remove them from the user list
                users[socket.id] = null; // remove their information from the server
        });
});
As you can see, socket.io supports a large variety of functions such as connection, disconnect, emit, to, and more. These functions make it easier to transfer data between the server and clients [SocketIo].
Express
Express is a framework that makes developing Node.js faster and easier. In many ways, it’s similar to how jQuery makes JavaScript development easier. Express is arguably the most widely used module that exists for Node.js. Because of this, many other modules such as Socket.io have support for Express. The following code is from the example project and demonstrates how Express can make Routing far easier. (Routing refers to the HTTP verbs, GET, PUT, DELETE, and POST. [LearningNode])
app.get('/', function(req, res) {
        res.sendFile(__dirname + '/index.html');
});
This code determines how the server should respond upon receiving a GET request from index.html [LearningNode].
Node.js Development
REPL (Read-Eval-Print Loop)
There’s a more efficient way to develop or test Node.js by using an interactive component called, “REPL”. You can start REPL by simply typing, “node” into the Node.js console. REPL is very similar to the console found in Google Chrome’s development console. You can simply type in some JavaScript and run it, with no need to mess with files. The following example demonstrates how REPL works. [LearningNode]
> var example = 10;
undefined
> console.log(example);
10
undefined
>
The symbol > designates a new line. So, in this example the user enters
var example = 10;, and later types console.log(example); in another line
which returns the result of the variable example.
REPL is a great tool for debugging and helps you figure out what’s happening with your Node.js code. It also supports various libraries such as rlwrap which allows you to change the color of the text, along with other useful modifications. REPL also has custom commands such as .save which saves your REPL session into a file, allowing you to develop entire projects in REPL. Some other commands include the following. [LearningNode]
| Command | Description |
|---|---|
| .break | Resets multi-line entries. |
| .clear | Resets everything. |
| .exit | Exits REPL. |
| .help | Lists all REPL commands |
| .load | Loads a previously saved REPL session. |
Node.js also supports the capability to create custom REPL. This can be done in
a normal Node.js file with var repl = require("repl");. Then you can create
the custom REPL by using repl.start. REPL will execute everything defined in
repl.start after running the file.
[LearningNode]
Try to save often while using REPL.
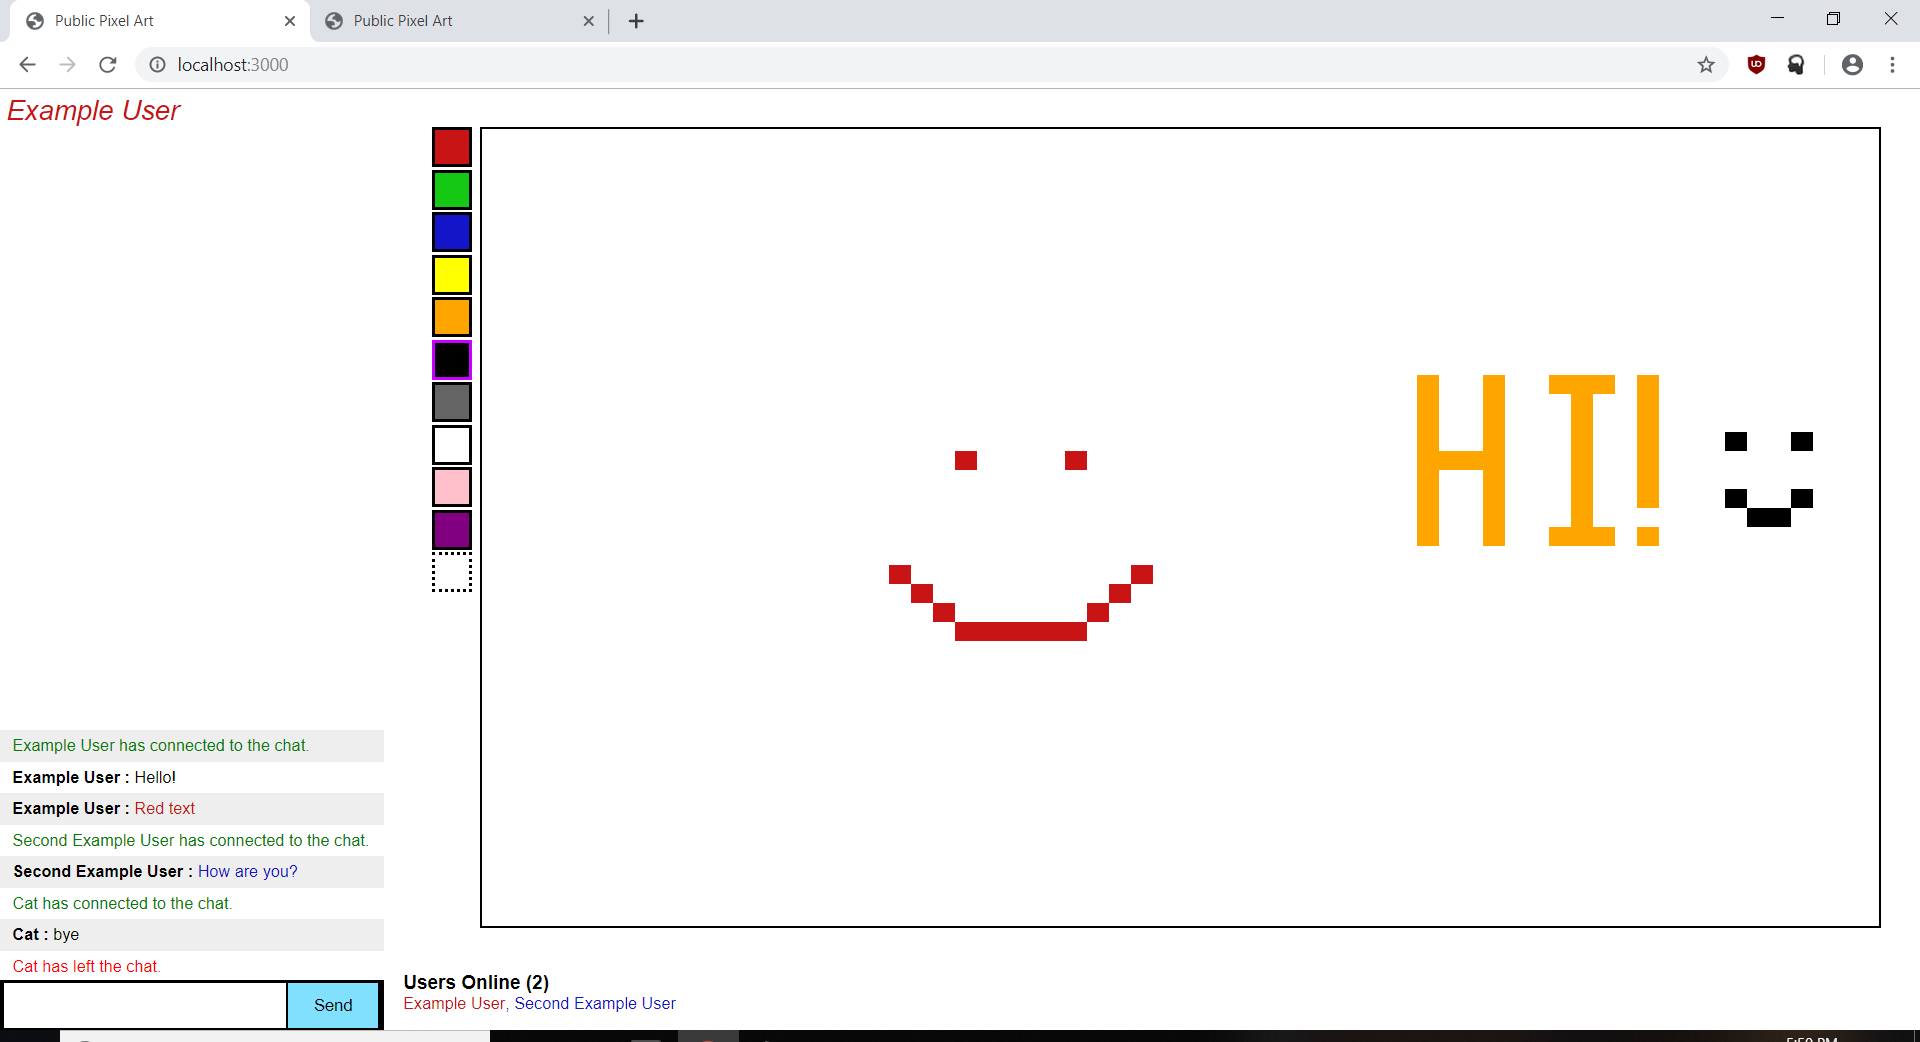
Example Project
This is a project I created with Node.js, Socket.io, and Express. It’s called, “Public Pixel Art” and is a web application that allows multiple people to all connect to a single chat where they can draw pixel art on the same canvas.
The CSS for the chat in the bottom left is a heavily modified version of the example from [SocketIo]
The following is the client-side code for the HTML page.
1 2 3 4 5 6 7 8 9 10 11 12 13 14 15 16 17 18 19 20 21 22 23 24 25 26 27 28 29 30 31 32 33 34 35 36 37 38 39 40 41 42 43 44 45 46 47 48 49 50 51 52 53 54 55 56 57 58 59 60 61 62 63 64 65 66 67 68 69 70 71 72 73 74 75 76 77 78 79 80 81 82 83 84 85 86 87 88 89 90 91 92 93 94 95 96 97 98 99 100 101 102 103 104 105 106 107 108 109 110 111 112 113 114 115 116 117 118 119 120 121 122 123 124 125 126 127 128 129 130 131 132 133 134 135 136 137 138 139 140 141 142 143 144 145 146 147 148 149 150 151 152 153 154 155 156 157 158 159 160 161 162 163 164 165 166 167 168 169 170 171 172 173 174 175 176 177 178 179 180 181 182 183 184 185 186 187 188 189 190 191 192 193 194 195 196 197 198 199 200 201 202 203 204 205 206 207 208 209 210 211 212 213 214 215 216 217 218 219 220 221 222 223 224 225 226 227 228 229 230 231 232 233 234 235 236 237 238 239 240 241 242 243 244 245 246 247 248 249 250 251 252 253 254 255 256 257 258 259 260 261 262 263 264 265 266 267 268 269 270 271 272 273 274 275 276 277 278 279 280 281 282 283 284 285 286 287 288 289 290 | <!-- Public Pixel Art -->
<!--
A web app that allows random people to connect to a chat where they can all draw pixel art on the same canvas.
-->
<!doctype html>
<html>
<head>
<title>Public Pixel Art</title>
<style>
/*
The CSS for the chat is a modified version of the example from https://socket.io/get-started/chat/
*/
* { margin: 0; padding: 0; box-sizing: border-box; }
body { font: 13px Helvetica, Arial;}
.chat_input { background: #000; padding: 3px; position: fixed; bottom: 0; width: 20%;}
.chat_input input { border: 0; padding: 10px; width: 75%; margin-right: .5%; }
.chat_input button { width: 24%; background: rgb(130, 224, 255); border: none; padding: 10px; }
#messages { list-style-type: none; margin: 0; padding: 0; }
#messages li { padding: 5px 10px; }
#messages li:nth-child(odd) { background: #eee; }
#messages { margin-bottom: 40px; margin-right: 10%; }
.username_input { text-align: center; margin-top: 100px;}
#users_online_section {margin-left: 21%; position: fixed; bottom: 2%;}
#pic_frame {margin-left: 25%; margin-top: 2%; position: fixed; width: 73%; height: 85%; border: 2px; border-style: solid;}
#message_section {position: fixed; right: 77.8%; left: 0; bottom: 0;}
#color_selection {position: fixed; width: 32px; margin-left: 22.5%; margin-top: 2%; list-style-type: none;}
.color_option {width: 32px; height: 32px; border: 2px; border-color: black; border-style:solid; margin-bottom: 2px;}
#username_disp {position: fixed; margin: 5px; font: 22px Helvetica, Arial; font-style: italic;}
</style>
</head>
<body id="body_stuff">
<script src="https://cdn.socket.io/socket.io-1.2.0.js"></script>
<script src="https://code.jquery.com/jquery-1.11.1.js"></script>
<!-- Username in top left. -->
<p id="username_disp">
</p>
<!-- The messages from the chat. -->
<div id="message_section">
<ul id="messages"></ul>
</div>
<!-- List of users online. -->
<div id="users_online_section">
<h3 id="users_online_title">Users Online</h3>
<p id="users_online" style="color: blue;"></p>
</div>
<!-- Input box for chat. -->
<form id="chat_form" class="username_input" action="">
<input id="chat_box" autocomplete="off" /><button id="sendButton">Set Username</button>
</form>
<!-- Allows you to change the color you draw with. -->
<ul id="color_selection">
<li id="first_color" class="color_option" style="background-color: rgb(200, 20, 20); border-color: rgb(200, 0, 255);"></li>
<li class="color_option" style="background-color: rgb(20, 200, 20);"></li>
<li class="color_option" style="background-color: rgb(20, 20, 200);"></li>
<li class="color_option" style="background-color: yellow;"></li>
<li class="color_option" style="background-color: orange;"></li>
<li class="color_option" style="background-color: black;"></li>
<li class="color_option" style="background-color: rgb(100, 100, 100);"></li>
<li class="color_option" style="background-color: white;"></li>
<li class="color_option" style="background-color: pink;"></li>
<li class="color_option" style="background-color: purple;"></li>
<li id="custom_color" class="color_option" style="background-color: white; border-style: dotted;"></li>
</ul>
<!-- Pixels for the picture. -->
<table id="pic_frame" border="0" cellpadding="0" cellspacing="0">
</table>
<script>
$(function() {
var socket = io(); // necessary to use socket.io
var chosen_color = "rgb(200, 20, 20)"; // color you draw with
var last_color = $('#first_color'); // used for highlighting the currently selected color
var choosing_name = true; // if the user has not yet set a username this is set to true
var user_color = "rgb(0, 0, 0)"; // color of the user's name and chat color
var users = 0; // total number of users
// If the user clicks their username in the top left, change their user color.
// The user color changes the color of their text in chat and the color of their username.
$('#username_disp').click(function() {
user_color = chosen_color; // Set user color to currently selected color
$(this).css("color", user_color); // Change color of username to new user color.
socket.emit("update user color", user_color); // Update new user color to server.
});
// Change which color the user draws with.
$('#color_selection').on('click', 'li', function() {
// Highlight the currently selected color.
last_color.css("border-color", "rgb(0, 0, 0)");
last_color = $(this);
$(this).css("border-color", "rgb(200, 0, 255)");
/* If the user has selected the custom color option, have them input the RGB values for the custom
color. Otherwise, simply set their chosen color to the color they selected.*/
if ($(this).attr("id") === 'custom_color') {
var temp_color = prompt("Type in the RGB value for the custom color.");
// some redex to make sure they are inputting RGB values, supports 3 formats:
// rgb(r, g, b)
// (r, g, b)
// r, g, b
var format_a = /^[r][g][b][(]\d{1,3}[,]\s?\d{1,3}[,]\s?\d{1,3}[)]$/;
var format_b = /^[(]\d{1,3}[,]\s?\d{1,3}[,]\s?\d{1,3}[)]$/;
var format_c = /^\d{1,3}[,]\s?\d{1,3}[,]\s?\d{1,3}$/;
var valid = false;
// If the text matched format b or format c it can easily be converted to format a.
// The colors in the picture array are stored in format a so these must be in format a.
if (format_a.test(temp_color)) {
chosen_color = temp_color;
} else if (format_b.test(temp_color)) {
chosen_color = "rgb" + temp_color;
} else if (format_c.test(temp_color)) {
chosen_color = "rgb(" + temp_color + ")";
} else {
chosen_color = $(this).css("background-color");
alert("Invalid RGB format. Please enter the color with a valid format. Example: (200,50,50)");
}
// Update color of custom color box to the new color.
$(this).css("background-color", chosen_color);
} else {
chosen_color = $(this).css("background-color");
}
});
// Tell the server which pixel the user clicks.
$('#pic_frame').on('click', 'td', function() {
// pic_frame is a table of pixels, jquery can find td that was clicked
var box_clicked = $(this).attr("id");
// The ids of the td elements are in a format axb (example, 20x30) where a and b is the column and row
var coords = box_clicked.split("x"); // find these coordinates by doing a split with delimiter x
// Put the location the user clicked and their chosen color into an object to send to server so that
// the picture may be updated on the server.
var click_info = {}
click_info.x = coords[0] || 0;
click_info.y = coords[1] || 0;
click_info.color = chosen_color;
socket.emit('box clicked', click_info);
});
// Runs when you click the submit button for the chat.
$('#sendButton').click(function() {
socket.emit('chat message', $('#chat_box').val()); // send information user typed to server
$('#chat_box').val(""); // empty chat box for new messages
return false; // prevents that weird refresh thing from happening
});
// Runs when a user loads the page.
socket.on('on page loaded', function(picture) {
if (choosing_name) { // only run this for users who have not selected their username yet
// Hide everything until they input their username.
$('#users_online_section').hide();
$('#pic_frame').hide();
$('#color_selection').hide();
// Set up the html for the picture from the server.
$('#pic_frame').empty();
for (var w = 0; w < picture.length; w++) {
var temp_row = $('<tr>');
for (var h = 0; h < picture[0].length; h++) {
var temp_cell = $('<td class="picbox" style="position: relative;">');
temp_cell.attr("id", w + "x" + h);
temp_cell.css("background-color", picture[w][h]);
temp_row.append(temp_cell);
}
$('#pic_frame').append(temp_row);
}
}
});
// Update the color of the pixel the user clicked.
socket.on('update box', function(box_info) {
var selector = box_info.x + "x" + box_info.y;
$('#' + selector).css("background-color", box_info.color);
});
// Display the message the user sent in chat.
socket.on('chat message', function(username, msg, color, override) {
/*
Appending the html directly like this,
$('#messages').append(username + " : " + msg) etc
would allow clients to run javascript and html on other clients, which is an issue.
All you would have to do is type something like this in chat,
<script>alert('hello');<//script>
and it would run that on every client. So, I'm appending it a different way to prevent
this from happening.
*/
// The override feature is used for messages sent by the server instead of a user.
// For example, when someone leaves or joins.
if (override.length > 0) {
var temp_li = $('<li>');
temp_li.css("color", color);
temp_li.text(override);
$('#messages').append(temp_li);
} else {
// Display the user's message, automatically put in their username and set the color of the
// message to their user color.
var temp_li = $('<li style="color: black;">');
temp_li.append($('<b>').text(username + " : "));
var temp_span = $('<span>');
temp_span.css("color", color);
temp_span.text(msg);
temp_li.append(temp_span);
$('#messages').append(temp_li);
}
// If there are too many messages, start removing them from the top so they don't go off the screen.
if ($('#messages li').size() > 27) $('#messages li').first().remove();
});
// After the user inputs their username, show everything and give them permission to use everything.
socket.on('on chat join', function(name) {
if (choosing_name) {
$('#chat_form').attr("class", "chat_input");
$('#sendButton').text("Send");
$('#users_online_section').show();
$('#pic_frame').show();
$('#color_selection').show();
$('#username_disp').text(name);
choosing_name = false;
}
});
// Update the list of users.
socket.on('userlist update', function(user_data) {
users = 0;
$('#users_online').empty();
// The server sends a list of user objects with the socket.id excluded.
// These will be put into the list.
for (var i = 0; i < user_data.length; i++) {
var user = user_data[i];
if (user) { // check that it's not null
users++;
// insert the commas for the list
var text_format = user.username;
if (users > 1 && i < user_data.length) text_format = ", " + user.username;
// have the color of the users correspond with the user color
var temp_span = $('<span>');
temp_span.attr("id", "user_" + user.username);
temp_span.text(text_format);
temp_span.css("color", user.user_color);
$('#users_online').append(temp_span);
}
}
// show number of users online
$('#users_online_title').text("Users Online (" + users + ")");
});
// Remove a user from the user list when they disconnect.
socket.on('userlist remove', function(user) {
users--;
$('#users_online_title').text("Users Online (" + users + ")"); // update this
// removes them from the list by id, id format is user_username (ex: user_dog)
$('#user_' + user.username).remove();
});
// When someone changes their user color, update this in the user list.
socket.on('userlist update color', function(user) {
$('#user_' + user.username).css("color", user.user_color);
});
});
</script>
</body>
</html>
|
The following is the server-side Node.js code.
1 2 3 4 5 6 7 8 9 10 11 12 13 14 15 16 17 18 19 20 21 22 23 24 25 26 27 28 29 30 31 32 33 34 35 36 37 38 39 40 41 42 43 44 45 46 47 48 49 50 51 52 53 54 55 56 57 58 59 60 61 62 63 64 65 66 67 68 69 70 71 72 73 74 75 76 77 78 79 80 81 82 83 84 85 86 87 88 89 90 91 92 93 94 95 96 97 98 99 100 101 102 103 104 105 106 107 108 109 110 111 112 | var app = require('express')(); // Implement express module
var http = require('http').Server(app); // Implement HTTP module and use it with Express
var io = require('socket.io')(http); // Implement socket.io module and use it with HTTP
var port = 3000;
var users = {}; // The set of all users connected to the server.
// A 2d array of pixels for the picture. Format: picture[col][row] = pixel RGB color
var picture = [...Array(42)].map(e => Array(64).fill("rgb(255, 255, 255)")); // JavaScript does not have a nice way to make 2d arrays.
var name_dict = []; // Used as a hash map to check if there are duplicated user names.
// Discussed earlier, some routing through Express.
app.get('/', function(req, res) {
res.sendFile(__dirname + '/index.html');
});
// Also discussed earlier, asynchronous listen that runs when port is established.
http.listen(port, function() {
console.log('Server is running on port ' + port);
});
// Also asynchronous, runs when a user connects to the server.
io.on('connection', function(socket) {
// Set up default user data for the user who connected to the server.
users[socket.id] = {};
users[socket.id].username = "Unconnected";
users[socket.id].name_chosen = false;
users[socket.id].user_color = "rgb(0, 0, 0)";
// Tell the client (and only this client, that's why it's io.to) that they connected to the server.
io.to(socket.id).emit('on page loaded', picture);
// This runs when the user tries to change their user color.
socket.on('update user color', function(color) {
// If their request color is valid, set it to that, otherwise set it to a default color.
var local_color = "rgb(0, 0, 0)";
if (isValidColor(color)) local_color = color;
// Don't bother changing it if it's the same color.
if (local_color !== users[socket.id].user_color) {
users[socket.id].user_color = local_color;
io.emit('userlist update color', users[socket.id]); // update this color in user list as well
}
});
// Runs when a user sends a message.
socket.on('chat message', function(msg){
/* The input box for the chat and the username input are the same. So, when they send a message
it needs to check whether they are sending a chat message or inputting their username.
*/
if (users[socket.id].name_chosen) {
// If they are sending a chat message, send it to all connected clients.
io.emit('chat message', users[socket.id].username, msg, users[socket.id].user_color, "");
} else {
// If they are inputting their username, set up the following,
// don't allow two users to have the same name
var temp_name = msg.substring(0, 20); // limit usernames to 20 characters
if (name_dict[temp_name] === undefined) {
name_dict[temp_name] = 0;
} else {
// If two users have the same name, make the new user have a number after their name.
name_dict[temp_name] = name_dict[temp_name] + 1;
temp_name = msg.substring(0, 17) + name_dict[temp_name];
}
users[socket.id].username = temp_name; // set their username
users[socket.id].name_chosen = true;
// Send a message to all clients telling them that someone has joined the chat.
io.emit('chat message', "", "", 'green', users[socket.id].username + " has connected to the chat.");
io.to(socket.id).emit('on chat join', msg); // Tell the client that they set their username and have joined successfully.
// Update the user list.
var local_user_data = [];
for (var temp in users) {
local_user_data.push(users[temp]);
}
io.emit('userlist update', local_user_data);
}
});
// Runs when a user clicks on a pixel.
socket.on('box clicked', function(click_data) {
// Only allow users who have selected a username to edit the picture.
if (users[socket.id].name_chosen) {
// Have default color be red, if the user has a valid selected color set it to that instead.
var local_color = "rgb(200, 20, 20)";
if (isValidColor(click_data.color)) local_color = click_data.color;
// Set the new color of the pixel for the client and server.
picture[click_data.x][click_data.y] = local_color;
io.emit('update box', click_data);
}
});
// Runs when a user leaves the chat.
socket.on('disconnect', function() {
// Send a message to all clients that someone left.
io.emit('chat message', "", "", 'red', users[socket.id].username + " has left the chat.");
io.emit('userlist remove', users[socket.id]); // remove them from the user list
users[socket.id] = null; // remove their information from the server
});
// This method uses regex to check that a color is in valid rgb format so that it can be inserted into the
// picture array without issues.
function isValidColor(color_str) {
var check = /^[r][g][b][(]\d{1,3}[,]\s?\d{1,3}[,]\s?\d{1,3}[)]$/;
return check.test(color_str);
}
});
|
Conclusion
In Conclusion, Node.js is a great tool for full-stack developers and for creating efficient, fast, and scalable web applications. Its support through modules such as Socket.io, Express, and more, allow you to easily implement features that would be complicated to create in other languages. Node.js is constantly being updated and is continuing to advance. Its asynchronous design prevents it from stalling or blocking. All around, Node.js is a great runtime environment if you want to quickly create a quality web application using JavaScript.
Citations
| [Nodejs] | (1, 2, 3) Node.js Foundation. “Node.js” Joyent Inc, Web. 2 April. 2019. |
| [NodejsDev] | (1, 2) Node.js Foundation. “Node.js Dev” Joyent Inc, Web. 2 April. 2019. |
| [LearningNode] | (1, 2, 3, 4, 5, 6, 7, 8, 9, 10, 11, 12, 13) Powers, Shelly, Learning Node. Sebastopol, O’Reilly, 2015. |
| [EventLoop] | (1, 2, 3) Node.js Foundation. “Node.js Event Loop” Joyent Inc, Web. 19 April. 2019. |
| [SocketIo] | (1, 2, 3) Damien Arrachequesne. “Socket.io” Socket.io, Web. 29 April. 2019. |